CubeOn Studio guide
From printer setup to ready-to-print plates
One practical workflow for preparing reliable CubeOn organizer prints.
New to CubeOn?
See the full workflow first
A short guided tour of the editor, from the measurements to a 3MF file for your slicer.
Open interactive demoQuick start in 5 steps
- Measure the space you want to fill in a few places and enter the smallest width, depth and height under Drawer.
- Choose your printer and nozzle, so every module is checked against your printer's bed.
- Add modules: click a cell for one corner, then the cell for the opposite corner. Fill empty cells or layout suggestions can do the rest.
- Select a module to set its compartments, label, lid and wall pattern.
- Open Output, choose Optimize print layout, then download the 3MF package for your slicer.
Using the editor
The editor at a glance
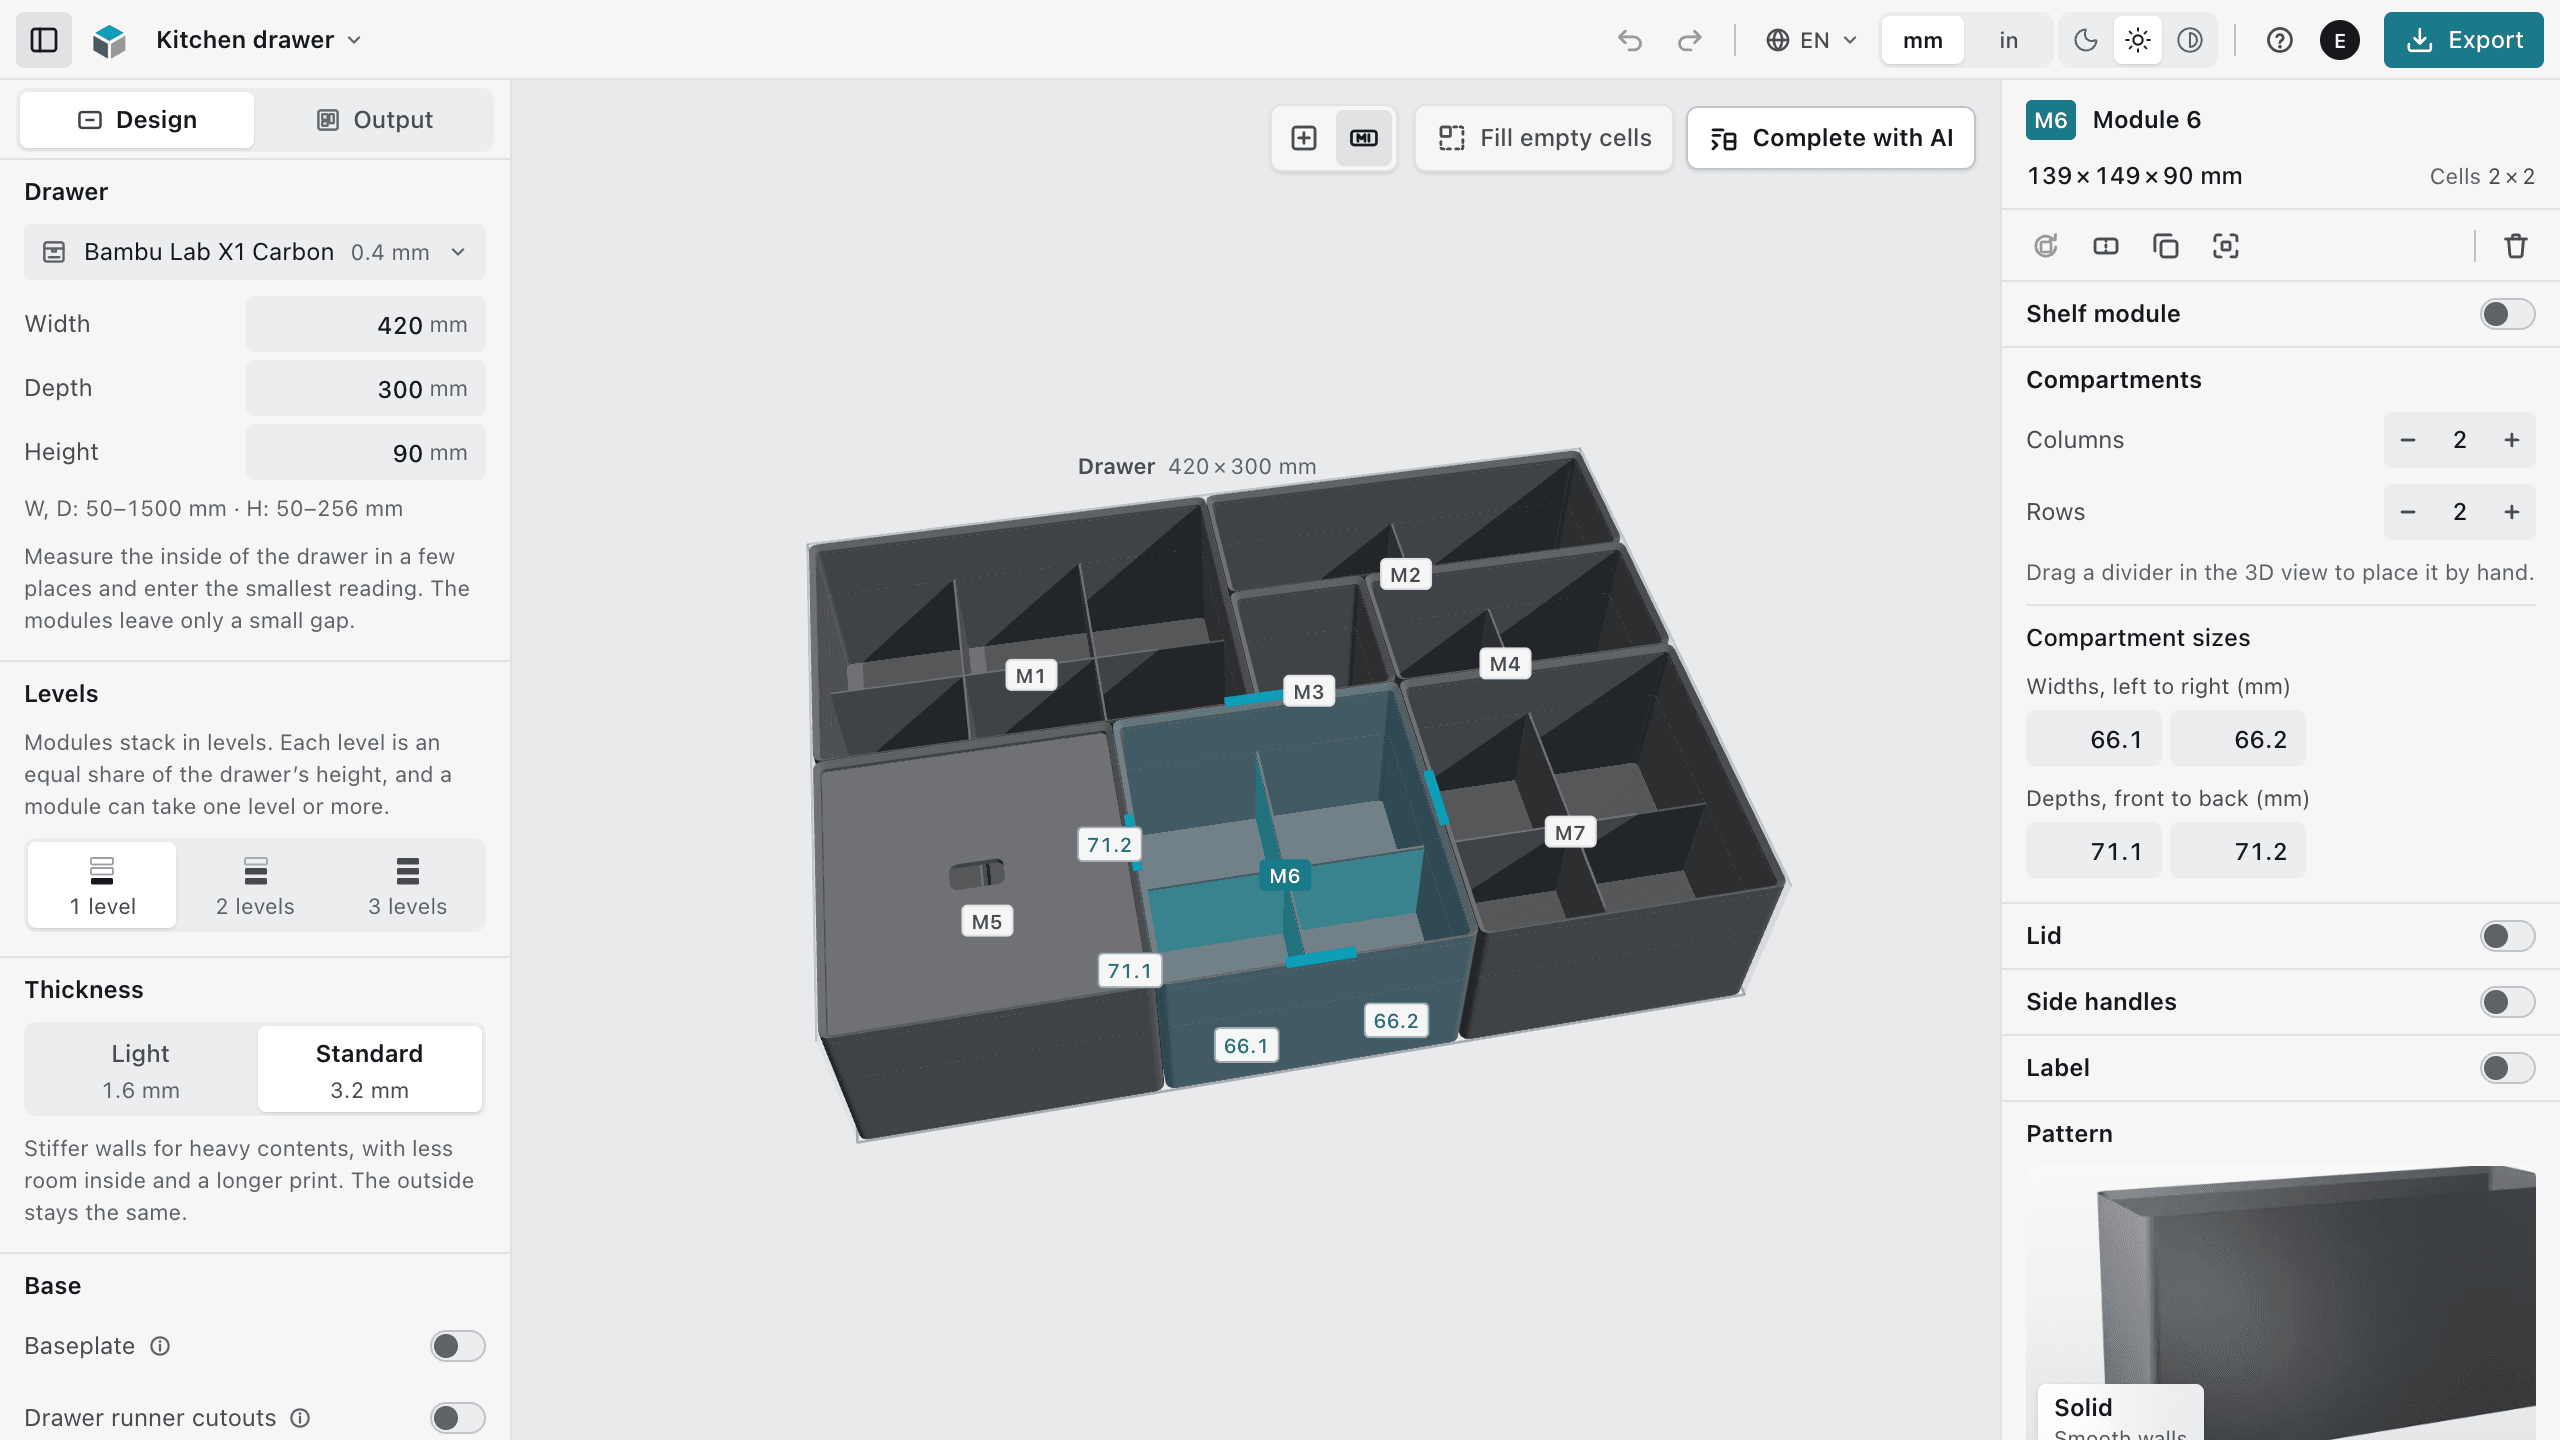
- 1Top bar: the project name, Undo and Redo, language, units, theme, Help (?) and Export.
- 2Design and Output. Design sets the space, the printer, levels, walls, base and projects; Output has the checks, the print plates and the downloads.
- 3The 3D view, where you draw and edit modules. Its tools: Top view, module labels, Fill empty cells and layout suggestions.
- 4The selected module: its size, compartments, lid, label, pattern and print estimate.
Modules
A module is one printed part. It covers one or more cells of the grid. The Help menu (?) in the top bar lists the same controls.
| Action | How |
|---|---|
| Add | Click two cells |
| Select | Click a module |
| Module menu | Right-click a module |
| Move | Drag the module’s floor← ↑ → ↓ |
| Resize | Drag a wallShift← ↑ → ↓ |
| Rotate 90° | R |
| Delete | Del |
| Cancel drawing or moving | Esc |
| Undo | CtrlZ |
| Redo | Ctrl⇧Z |
| Measurements | ↑ ↓Shift×10 |
- Right-click a module for Rotate module, Join with…, Duplicate module and Delete module.
- Join with… makes one module from two that share a side, on the same level and at the same height: an L, a T or a longer rectangle. A joined module keeps its walls, floor and stacking; dividers, lid, label, pattern and shelves are not available for it yet. Unjoin splits it back into rectangles.
- Modules stack in up to three levels. Choose how many under Levels, and the level you draw on in the 3D view. A module can take one level or more: set it under Height in the module panel.
- A module on an upper level gets a bottom fitted to the modules under it: one hollow foot over each module it stands on, with a groove only where two of them meet. It prints faster and uses less filament, but the printed module fits only its place in the layout: if you move modules, download their files again.
- Compartments: up to 10 columns and 10 rows. Drag a divider in the 3D view to place it by hand, or type exact widths and depths under Compartment sizes. Each compartment is at least 5 mm.
- Lid adds a lid.
- Label takes up to 24 characters. Where the module has room for a tile, a new label is Swappable: the text goes on a separate tile, so when the contents change you print a new tile, not a new module. Permanent, under Label type, prints the text into the module itself, on the sides or on the top collar, as text or in Braille.
- Placement of a swappable label: On top is a tile in a pocket under the lid, and Also at the back adds a second one. In the walls are tiles that slide in from the top, on the inside of the module, and show through a window, so nothing stands out of the walls; their text is printed flush. A new label goes on top when the module has room for it, otherwise into the walls. No tile goes into a wall with a runner cutout or a side handle. Braille tiles go only into the walls, pressed into pockets with the dots level with the wall.
- Side handles cut a finger slot into each of the two shorter walls, so the module is easy to lift out. Every slot is 40 × 14 mm with rounded ends and chamfered edges, its top edge 13 mm under the rim, so the slots line up across modules of the same height. On a short wall the slot gets shorter and never takes more than half of the wall; below 24 mm the module has none. In a full drawer the neighbouring module covers the slots from outside, and small parts above their lower edge can fall out. The module panel shows the size, or why no slot fits; shelf modules and joined modules have none. If a divider meets the middle of the wall, the wall gets two slots instead, one in the middle of each compartment beside it, each at most a quarter of the wall. On a low module the slot is less tall, down to 12 mm. On a bottom-level module at the left or right edge of the drawer, with Drawer runner cutouts on, the slots go into the front and back walls.
- Pattern cuts window, arch or triangle openings into the side walls. They use less filament and need no supports. Windows print about as fast as solid walls; the denser arches and triangles take up to about 20% longer. Diamonds, reliefs, honeycomb and japandi stay only on modules that already have them; honeycomb and japandi take 1.2 to 3.4 times as long.
- Shelf module opens one wall, front, back, left or right, and adds up to 8 shelves and 8 dividers, so a module can also stand on a countertop or a shelf.
- Contents names what a module holds. It shows in the editor only and is never printed.
- Print review flags a module that may print badly and suggests a fix.
Camera
| Action | How |
|---|---|
| Rotate | Drag outside the modules |
| Pan | Right-dragShift+ Left |
| Zoom | Scroll |
| Top view | Double-click empty space |
In the module panel, Zoom in to the selected module brings the camera close to it, and Return to the previous view takes it back.
In the module panel, Show from the side spreads the modules apart and shows them from the front, so patterns and labels on the sides can be seen. While they are spread, their tags (M1, M2…) are hidden and they can't be selected. They close up again as soon as the camera is back in the top view, whichever way it gets there.
Fill empty cells and layout suggestions
Fill empty cells fills the free cells of the current level. It previews up to three variants in the 3D view, from the largest modules to single cells, and adds nothing until you choose Add modules.
Layout suggestions (AI) plan a layout from up to three photos of what you want to store, or from a description. Generate with AI starts from an empty space; Complete with AI works with the modules already there. You get up to three layouts; Use this layout adds one, and one Undo takes it back.
Complete the drawer keeps your modules. Redesign the drawer replaces them, except the ones with Keep when redesigning switched on.
Photos and your description are sent to an AI service to be read. CubeOn does not store them, and location data is removed from photos first.
Layout suggestions come with Maker and Commercial: up to 20 requests a day and 200 in 30 days. A free account can try them three times.
Saving your work
- Maker and Commercial: choose Save to cloud once; after that, every change saves itself within seconds. Account lists your cloud projects; Maker keeps up to 25.
- Preview, or without an account: Save in this browser keeps a named copy in this browser only. Save again after changes.
- Save as copy and New project are under Projects as well.
- If the page closes, the editor keeps your latest design in this browser and brings it back when you return.
Sizes and limits
- Width and depth
- 50 to 1500 mm
- Height
- Up to the printer’s print height on each level
- Levels
- Up to 3
- One module
- Up to the printer’s bed, clear of its exclusion zones; 250 × 250 mm until you choose a printer
- Compartments
- At least 5 mm each
- One 3MF file
- Up to 36 plates and 100 modules
From model to print
1. Prepare the printer
Choose your printer and nozzle in Design → Drawer or in Output → Printer. CubeOn uses its X, Y and Z build volume and any non-printable bed zones when checking modules and arranging print plates.
- Run the calibration procedure recommended by the printer or slicer manufacturer.
- Check first-layer adhesion and remove visible elephant's foot before judging mechanical fit.
- Calibrate filament flow when changing material, manufacturer, or print profile.
- Print one representative module before starting a large multi-plate project.
Do not change X/Y motion steps from a single calibration cube unless your printer manufacturer explicitly requires that procedure. Motion calibration and extrusion-flow calibration solve different problems.
2. Nozzle and walls
Studio supports 0.4, 0.6 and 0.8 mm nozzles. Drawer organizers are not precision miniatures, so a wider nozzle saves a lot of print time; section 5 has the figures. Wall, divider and floor presets follow the nozzle you pick; Light walls stay 1.6 mm.
Light walls
Lower material use and narrower seams between adjacent modules.
Standard walls
Thicker walls, 3.2 to 4.0 mm depending on the nozzle, for a stiffer module.
The slicer still controls layer height, perimeter toolpaths, infill, temperature, speed, and material-specific settings. CubeOn exports the model geometry and does not replace a calibrated slicer profile.
3. Optimize the print layout
Open Output and choose Optimize print layout. CubeOn sorts modules by footprint, tests both 0° and 90° orientations, keeps a 5 mm bed margin and 3 mm spacing, avoids printer exclusion zones, and fills consecutive plates, up to 36 (the most Bambu Studio opens in one 3MF).
- Output → Build plate shows one thumbnail per plate (P1, P2, …) with the numbers of its modules.
- Editing the project clears the old layout; run optimization again before export.
- A module that exceeds the selected printer's build volume must be resized or printed on a larger printer.
- The result is a practical deterministic arrangement, not a guarantee of the mathematical optimum.
4. Export and slice
The 3MF export keeps nested modules together on their assigned slicer plates, including their X/Y position and 90° rotation. The STL ZIP groups multi-plate jobs into PLATE_1, PLATE_2, and subsequent folders and includes PRINT_LAYOUT.json as a placement reference.
Swappable labels in the Output tab set one style for every tile in the project: Raised text in a second filament (without an AMS, Pause for the text filament stops the labels plate at the first text layer so you can change the filament), Flush, One colour or No text, with the tile and text colours. The label sheet lists every tile in module order: type or paste the texts there, and each tile shows New, Changed or Printed. Download labels to print gives a 3MF with just the new and changed tiles. The project's 3MF puts all the tiles on a Labels plate, and the STL ZIP in a LABELS folder.
Before printing, inspect every plate in your slicer, check that the printer and nozzle profile match the ones you exported for, and verify adhesion, supports, seam placement, and any slicer warnings.
Strings across compartments: the 3MF turns on “Avoid crossing wall” in Bambu Studio’s process settings, so the nozzle travels along the walls instead of over empty compartments. If you slice the STL files, turn it on yourself; the print takes about 3% longer.
5. Shorten print time
A full drawer is a long print. These settings change it the most; the figures come from Bambu Studio on a Bambu Lab H2S.
- Filament profile: Generic PLA allows 12 mm³/s of flow, Bambu PLA Basic allows 30 mm³/s. The same drawer took 72 h against 49 h.
- Nozzle: a wider nozzle prints a drawer much faster. In the editor’s estimate, a 0.6 mm nozzle takes about a third to a half less time than 0.4 mm, and 0.8 mm up to 60% less. With Standard walls, 0.8 mm is barely faster than 0.6 mm, sometimes slower, and uses more filament. The printer dialog shows the time and filament for your drawer on the nozzle you pick, and Output names the fastest one.
- Line width, Light walls only: on a 0.6 mm nozzle, the 3MF sets the wall line width to 0.80 mm for every Light module except one with a text label on top: at 0.80 mm its thin strokes drop out (Braille keeps every dot). A 1.6 mm Light wall is then exactly two extrusions instead of two plus a filled strip: 20 to 36% less print time with smooth walls and 19 to 25% with a wall pattern, on slightly less filament. If you slice the STL files, set it yourself. Do not do this with Standard walls: a 3.6 mm wall divides worse at 0.80 mm and the same module took 13% longer on 14% more filament.
- Walls: Light prints faster than Standard — about 17% with a 0.4 mm nozzle and about 40% with 0.8 mm. Side labels print on both.
- Wall patterns: windows print about as fast as smooth walls; the denser arches and triangles take up to about 20% longer, most with a 0.4 mm nozzle. All of them use less filament, and none of their openings has a flat top, so they need no supports. Honeycomb and japandi take 1.2 to 3.4 times as long, because each of their many small openings costs a retraction on every layer. The editor shows the factor when it is noticeable.
- Printer speed mode: the faster modes in your printer (for example Sport on Bambu Lab) shorten the print without touching the model. Check the result on one module first.
- Fewer, larger modules print faster than many small ones, because every module pays for its own walls and floor.
The editor's estimate assumes Bambu PLA Basic and the print profile the 3MF selects. Your slicer always shows the exact time.